- Published on
Building a Simple Web App with Supabase
- Authors
I wrote this post to help my friend Millena, who’s learning frontend development and wants to deploy a simple web app. Her project is a finance tool for tracking expenses, but she needed a backend to store and sync data across devices. Since Millena is new to backend development, I suggested she use a "Backend as a Service" solution, like Supabase. In this guide, I'll walk through how to build a simple "groceries list" app using Supabase for the backend.
Project Overview
The app we’ll build is straightforward, using the following technologies:
- Frontend:
- Vanilla JavaScript
- HTML
- Bootstrap for styling and UI components
- GitHub Pages for serving static files
- Backend:
- Supabase Auth (Password-based)
- Supabase Database
1. Set Up the Backend
The first step is configuring the Supabase backend.
- Create a Supabase Account: I opted for the Supabase free tier.
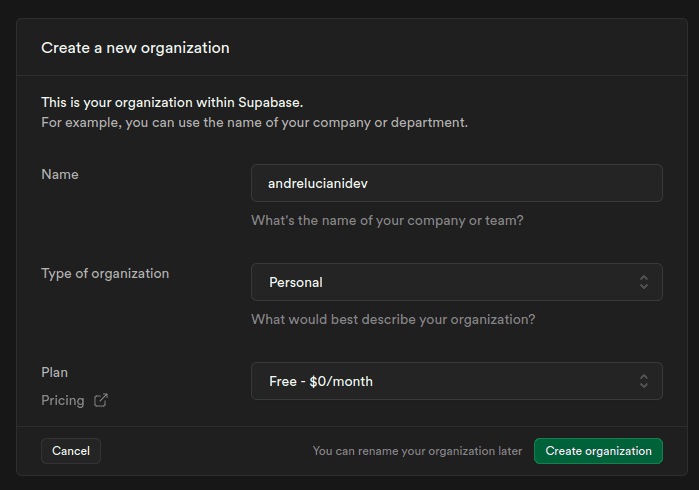
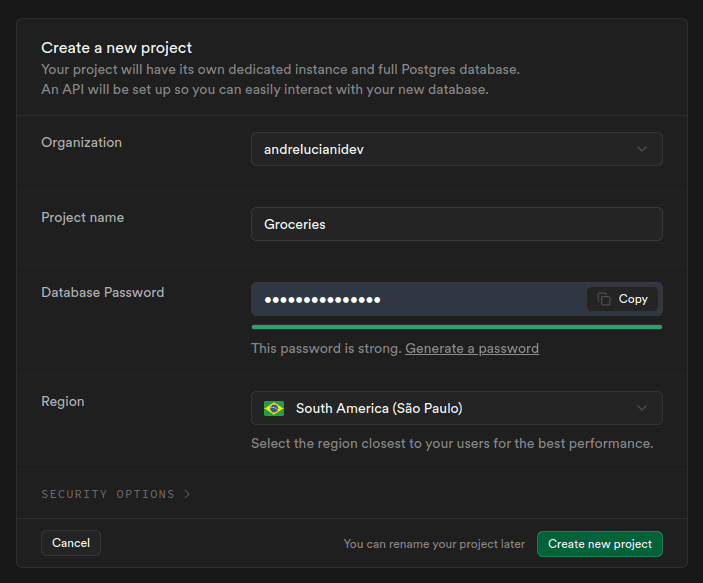
- Create a New Project: In this guide, I’ll be creating a grocery list app. However, the architecture will remain similar to my friend's expense-tracking app.
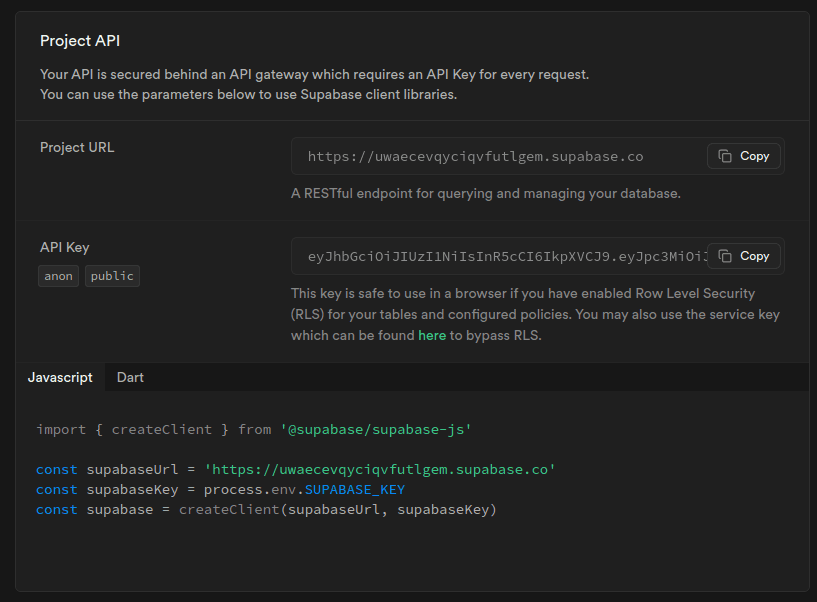
- Obtain the Project API URL and API Key: These will be needed to interact with the backend.
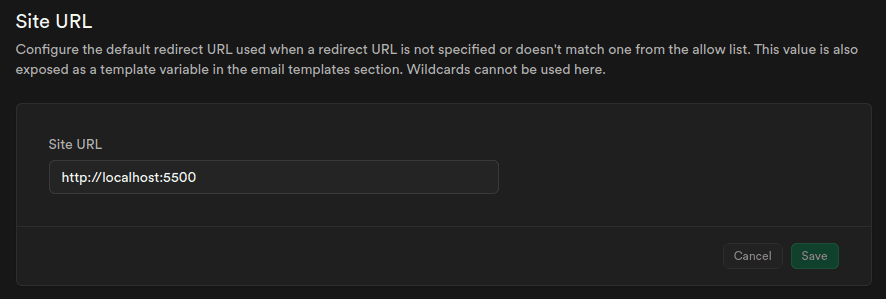
- Configure the App URL: Set the frontend’s URL in the Auth settings at
https://supabase.com/dashboard/project/<YOUR-PROJECT-SLUG>/auth/url-configuration. Initially, this can point to the local development path, typicallyhttp://localhost:<SOME-PORT>, which in my case is5500.
With these steps, we have everything needed to build the client: authentication and a database. One thing I appreciate about Supabase is how it provisions various tools (like auth and database) by default, along with the APIs to interact with them—REST, GraphQL, and Realtime (WebSockets). For this project, I’ll be using the REST API, accessed via the Supabase JavaScript client.
Next, we’ll create the table for storing our grocery list data.
2. Structure the Frontend
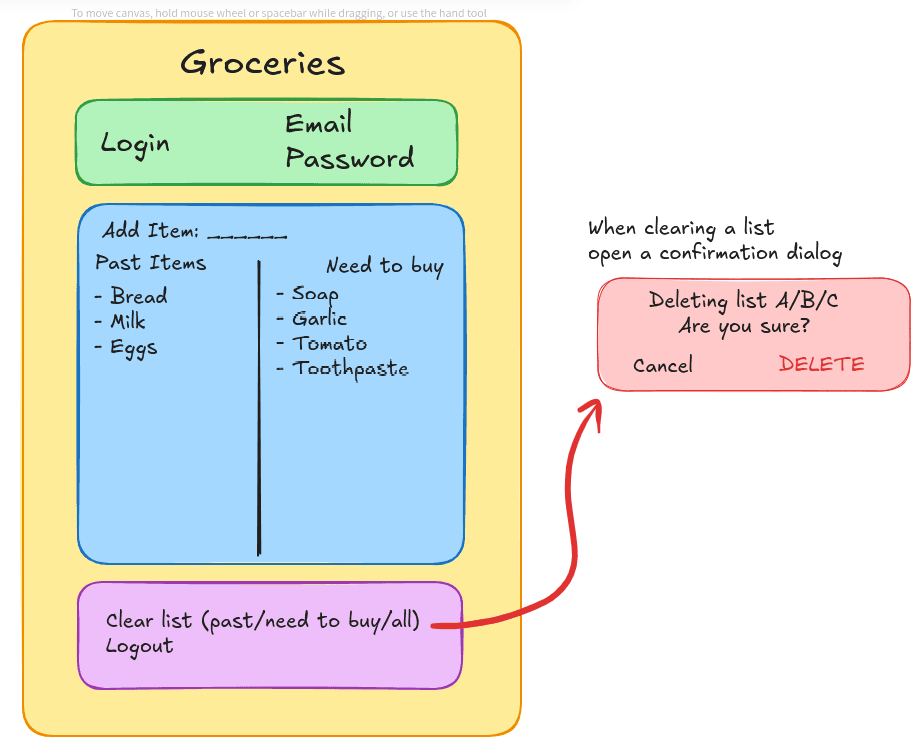
For simplicity, we’ll use just one HTML and one JavaScript file. The page will be divided into four sections: login, grocery list, delete/logout, and a modal. I’ll use Bootstrap to speed up the design process.
The login section will be displayed for unauthenticated users, while the other sections will be shown once a user is logged in.
Create Project and Files
Let’s start by creating the base files for the project, beginning with the HTML:
<!doctype html>
<html lang="en">
  <head>
    <meta charset="utf-8">
    <meta name="viewport" content="width=device-width, initial-scale=1">
    <title>Groceries</title>
    <link href="https://cdn.jsdelivr.net/npm/bootstrap@5.3.3/dist/css/bootstrap.min.css" rel="stylesheet" integrity="sha384-QWTKZyjpPEjISv5WaRU9OFeRpok6YctnYmDr5pNlyT2bRjXh0JMhjY6hW+ALEwIH" crossorigin="anonymous">
  </head>
  <body>
    <h1>Groceries</h1>
    <script src="https://cdn.jsdelivr.net/npm/bootstrap@5.3.3/dist/js/bootstrap.bundle.min.js" integrity="sha384-YvpcrYf0tY3lHB60NNkmXc5s9fDVZLESaAA55NDzOxhy9GkcIdslK1eN7N6jIeHz" crossorigin="anonymous"></script>
  </body>
</html>
Next, we’ll publish the code to GitHub and set up GitHub Pages:
$ git init
$ git add .
$ git commit -m "Initial commit"
$ gh repo create groceries --private --source=. --remote=origin --push
✓ Created repository andreluciani/groceries on GitHub
  https://github.com/andreluciani/groceries
✓ Added remote git@github.com:andreluciani/groceries.git
Enumerating objects: 3, done.
Counting objects: 100% (3/3), done.
Delta compression using up to 4 threads
Compressing objects: 100% (2/2), done.
Writing objects: 100% (3/3), 629 bytes | 629.00 KiB/s, done.
Total 3 (delta 0), reused 0 (delta 0), pack-reused 0
To github.com:andreluciani/groceries.git
 * [new branch]      HEAD -> main
Branch 'main' set up to track remote branch 'main' from 'origin'.
✓ Pushed commits to git@github.com:andreluciani/groceries.git
On GitHub, configure GitHub Pages by selecting the main branch, and save. This will serve the static files:
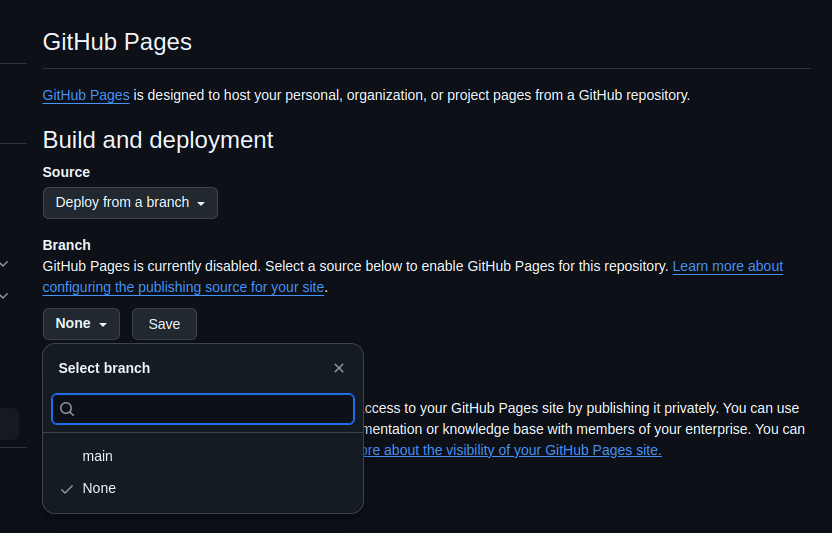
After deploying, the page will be available at: https://andreluciani.github.io/groceries/.
Sign-Up and Sign-In Flow
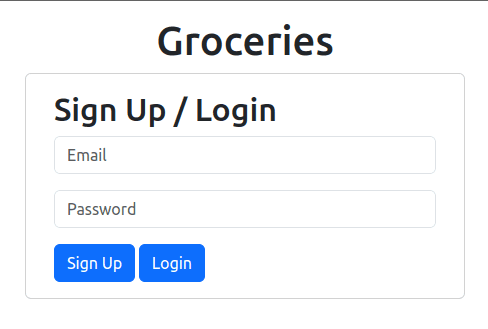
Now, we’ll create the sign-up/sign-in forms and link them to the Supabase backend.
Start by building the Sign-Up/Sign-In component:
<!doctype html>
<html lang="en">
  <head>
    <meta charset="utf-8">
    <meta name="viewport" content="width=device-width, initial-scale=1">
    <title>Groceries</title>
    <link href="https://cdn.jsdelivr.net/npm/bootstrap@5.3.3/dist/css/bootstrap.min.css" rel="stylesheet" integrity="sha384-QWTKZyjpPEjISv5WaRU9OFeRpok6YctnYmDr5pNlyT2bRjXh0JMhjY6hW+ALEwIH" crossorigin="anonymous">
  </head>
  <body>
-    <h1>Groceries</h1>
+    <div id="app" class="container mt-3 bd-layout">
+      <h1 class="text-center">Groceries</h1>
+      <section id="login">
+        <div class="row justify-content-md-center">
+          <div class="col-md-4 card">
+            <div class="card-body">
+              <h2 class="card-title">Sign Up / Login</h2>
+              <form>
+                <div class="mb-3">
+                  <input type="email" class="form-control" id="email" placeholder="Email" required />
+                </div>
+                <div class="mb-3">
+                  <input type="password" class="form-control" id="password" placeholder="Password" required />
+                </div>
+                <button id="signup-btn" class="btn btn-primary">Sign Up</button>
+                <button id="login-btn" class="btn btn-primary">Login</button>
+              </form">
+            </div>
+          </div>
+        </div>
+      </section>
+    </div>
    <script src="https://cdn.jsdelivr.net/npm/bootstrap@5.3.3/dist/js/bootstrap.bundle.min.js" integrity="sha384-YvpcrYf0tY3lHB60NNkmXc5s9fDVZLESaAA55NDzOxhy9GkcIdslK1eN7N6jIeHz" crossorigin="anonymous"></script>
  </body>
</html>
Here’s how it will look:
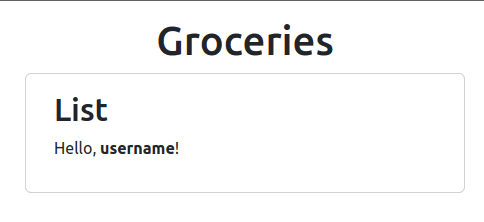
Next, add the grocery list section. For now, we’ll just display a "Hello" message to validate the sign-up/login flow:
<!doctype html>
<html lang="en">
  <head>
    <meta charset="utf-8">
    <meta name="viewport" content="width=device-width, initial-scale=1">
    <title>Groceries</title>
    <link href="https://cdn.jsdelivr.net/npm/bootstrap@5.3.3/dist/css/bootstrap.min.css" rel="stylesheet" integrity="sha384-QWTKZyjpPEjISv5WaRU9OFeRpok6YctnYmDr5pNlyT2bRjXh0JMhjY6hW+ALEwIH" crossorigin="anonymous">
  </head>
  <body>
    <div id="app" class="container mt-3 bd-layout">
      <h1 class="text-center">Groceries</h1>
      <section id="login">
        <div class="row justify-content-md-center">
          <div class="col-md-4 card">
            <div class="card-body">
              <h2 class="card-title">Sign Up / Login</h2>
              <form>
                <div class="mb-3">
                  <input type="email" class="form-control" id="email" placeholder="Email" required />
                </div>
                <div class="mb-3">
                  <input type="password" class="form-control" id="password" placeholder="Password" required />
                </div>
                <button id="signup-btn" class="btn btn-primary">Sign Up</button>
                <button id="login-btn" class="btn btn-primary">Login</button>
              </form>
            </div>
          </div>
        </div>
      </section>
+      <section id="list" class="d-none">
+        <div class="row justify-content-md-center">
+          <div class="col-md-4 card">
+            <div class="card-body">
+              <h2 class="card-title">List</h2>
+              <p>Hello, <span id="username" class="fw-bold"></span>!</p>
+            </div>
+          </div>
+        </div>
+      </section>
    </div>
    <script src="https://cdn.jsdelivr.net/npm/bootstrap@5.3.3/dist/js/bootstrap.bundle.min.js" integrity="sha384-YvpcrYf0tY3lHB60NNkmXc5s9fDVZLESaAA55NDzOxhy9GkcIdslK1eN7N6jIeHz" crossorigin="anonymous"></script>
  </body>
</html>
To hide the grocery list initially, I added the class d-none, which will toggle visibility based on the user’s authentication status:
Awesome! Now that the HTML structure is done, we can add JavaScript to interact with the backend.
We’ll need to:
- Create a JavaScript file and link it to the HTML.
- Create a Supabase JS Client.
- Add sign-up and login functions, attached to their respective buttons.
- Implement helper functions to control which sections to display.
- Add a logout button with its functionality.
An empty JavaScript file was created at /script/main.js and linked to the HTML, along with the supabase-js library:
    ...
    </div>
    <script src="https://cdn.jsdelivr.net/npm/bootstrap@5.3.3/dist/js/bootstrap.bundle.min.js" integrity="sha384-YvpcrYf0tY3lHB60NNkmXc5s9fDVZLESaAA55NDzOxhy9GkcIdslK1eN7N6jIeHz" crossorigin="anonymous"></script>
    <script src="https://cdn.jsdelivr.net/npm/@supabase/supabase-js@2"></script>
    <script src="./script/main.js"></script>
  </body>
</html>
Now let’s write the code to create the Supabase client and the authentication functions.
- Supabase Client: Use the API URL and key to initialize the Supabase client with
createClient():
const supabase = window.supabase;
const supabaseUrl = "https://uwaecevqyciqvfutlgem.supabase.co";
const supabaseAnonKey =
  "eyJhbGciOiJIUzI1NiIsInR5cCI6IkpXVCJ9.eyJpc3MiOiJzdXBhYmFzZSIsInJlZiI6InV3YWVjZXZxeWNpcXZmdXRsZ2VtIiwicm9sZSI6ImFub24iLCJpYXQiOjE3MjY3NzA3MzksImV4cCI6MjA0MjM0NjczOX0.2W_OKxWOoyZ0bRjHg6oBPHeTOwnqzm-v6nXG4xOmPqw";

const sup = supabase.createClient(supabaseUrl, supabaseAnonKey);
- Authentication Functions: Create the sign-up and login functions, and attach them to their buttons:
...
const emailInput = document.getElementById("email");
const passwordInput = document.getElementById("password");
const signupBtn = document.getElementById("signup-btn");
const loginBtn = document.getElementById("login-btn");
const loginSection = document.getElementById("login");
const listSection = document.getElementById("list");
const usernameSpan = document.getElementById("username");

signupBtn.addEventListener("click", async (e) => {
  e.preventDefault();
  const email = emailInput.value;
  const password = passwordInput.value;
  const { error } = await sup.auth.signUp({
    email: email,
    password: password,
  });
  if (error) {
    console.error("Error signing up:", error.message);
  } else {
    console.info("Sign up successful! Please check your email to confirm.");
  }
});

loginBtn.addEventListener("click", async (e) => {
  e.preventDefault();
  const email = emailInput.value;
  const password = passwordInput.value;
  const { data, error } = await sup.auth.signInWithPassword({
    email: email,
    password: password,
  });
  if (error) {
    console.error("Error logging in:", error.message);
  } else {
    showGroceriesList(data.user);
  }
});
Helper Functions: Implement functions to:
- Check for an active session on page load.
- Verify successful login.
- Toggle the visibility of sections based on authentication status.
...
window.addEventListener("load", async () => {
  const { data } = await sup.auth.getSession();
  if (data.session) {
    showGroceriesList(data.session.user);
  } else {
    showLoginForm();
  }
});

sup.auth.onAuthStateChange((event, session) => {
  if (event === "SIGNED_IN") {
    showGroceriesList(session.user);
  }
});

function showGroceriesList(user) {
  loginSection.classList.add("d-none");
  loginSection.classList.remove("d-block");
  listSection.classList.add("d-block");
  listSection.classList.remove("d-none");
  usernameSpan.textContent = user.email;
}

function showLoginForm() {
  loginSection.classList.add("d-block");
  loginSection.classList.remove("d-none");
  listSection.classList.add("d-none");
  listSection.classList.remove("d-block");
  usernameSpan.textContent = "";
}
Finally, add the logout button and its function:
...
+      <section id="controls" class="d-none">
+        <div class="row justify-content-md-center mt-3">
+          <div class="col-md-4 card">
+            <div class="card-body">
+              <h3 class="card-title">Controls</h3>
+              <button id="logout-btn" class="btn btn-outline-primary">Logout</button>
+            </div>
+          </div>
+        </div>
+      </section>
...
...
+const logoutBtn = document.getElementById("logout-btn");
+const controlsSection = document.getElementById("controls");

+logoutBtn.addEventListener("click", async (e) => {
+  e.preventDefault();
+  const { error } = await sup.auth.signOut();
+  if (error) {
+    console.error("Error logging out:", error.message);
+  } else {
+    showLoginForm();
+  }
+});

sup.auth.onAuthStateChange((event, session) => {
  if (event === "SIGNED_IN") {
    showGroceriesList(session.user);
  }
+  if (event === "SIGNED_OUT") {
+    showLoginForm();
+  }
});

function showGroceriesList(user) {
  loginSection.classList.add("d-none");
  loginSection.classList.remove("d-block");
  listSection.classList.add("d-block");
  listSection.classList.remove("d-none");
+  controlsSection.classList.add("d-block");
+  controlsSection.classList.remove("d-none");
  usernameSpan.textContent = user.email;
}

function showLoginForm() {
  loginSection.classList.add("d-block");
  loginSection.classList.remove("d-none");
  listSection.classList.add("d-none");
  listSection.classList.remove("d-block");
+  controlsSection.classList.add("d-none");
+  controlsSection.classList.remove("d-block");
  usernameSpan.textContent = "";
}
...
Groceries List
Now it’s time to implement the grocery list functionality. First, let’s enhance the initial draft:

Here’s the expected behavior:
- When an item is added, it should appear in the "Need to buy" list.
- Clicking "Delete" will move the item to the "Past" list.
- Items in the "Past" list can be restored to the "Need to buy" list.
- Items in either list can be permanently deleted.
We’ll begin by adding the necessary HTML elements:
...
      <section id="list" class="d-none">
        <div class="row justify-content-md-center m-2">
          <div class="col-md-8 p-2 card">
            <div class="card-body">
              <h2 class="card-title">List</h2>
+              <div class="input-group">
+                <span class="input-group-text">Item</span>
+                <input type="text" class="form-control" id="item-input" placeholder="E.g. Apple" />
+                <button id="add-item-btn" class="btn btn-outline-success">Add</button>
+              </div>
+            </div>
+            <div class="row gx-2">
+            <div class="col">
+              <div class="card h-100">
+                <div class="card-body">
+                  <h2 class="card-title">Past Items</h2>
+                  <ul class="list-group" id="past-items-list">
+                    <li class="list-group-item">An item</li>
+                    <li class="list-group-item">A second item</li>
+                    <li class="list-group-item">A third item</li>
+                  </ul>
+                </div>
+              </div>
+            </div>
+            <div class="col">
+              <div class="card h-100">
+                <div class="card-body">
+                  <h2 class="card-title">Need to buy</h2>
+                  <ul class="list-group" id="groceries-list">
+                    <li class="list-group-item">An item</li>
+                    <li class="list-group-item">A second item</li>
+                    <li class="list-group-item">A third item</li>
+                    <li class="list-group-item">A fourth item</li>
+                    <li class="list-group-item">And a fifth one</li>
+                  </ul>
+                </div>
+              </div>
            </div>
          </div>
        </div>
      </section>
...
This creates the following layout:
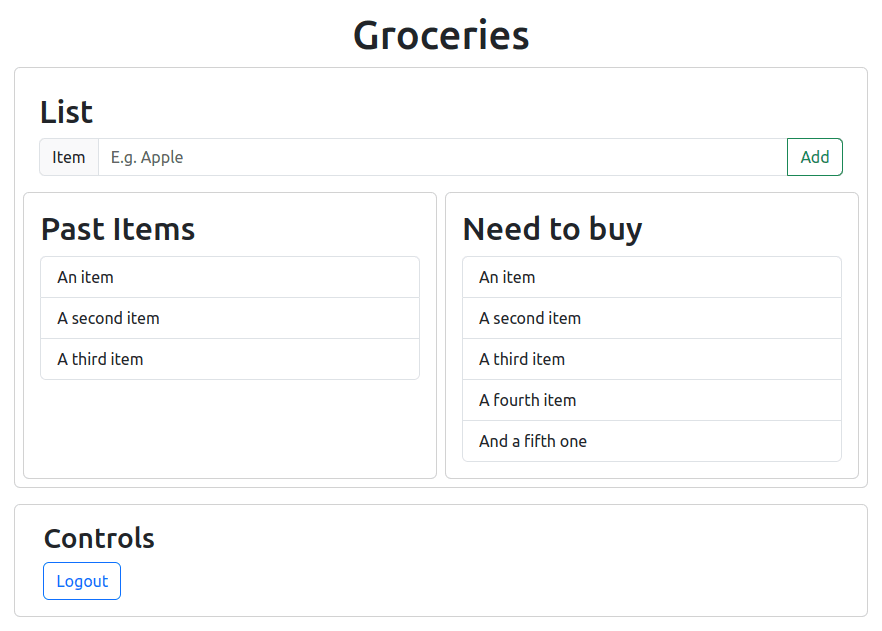
Now, let’s implement the JavaScript function for adding items to the list:
...
// Groceries List Management
const itemInput = document.getElementById("item-input");
const addItemBtn = document.getElementById("add-item-btn");
const groceriesList = document.getElementById("groceries-list");

addItemBtn.addEventListener("click", async (e) => {
  e.preventDefault();
  const item = itemInput.value;
  if (item.length > 2) {
    const newItem = document.createElement("li");
    newItem.className = "list-group-item";
    newItem.textContent = item;
    groceriesList.appendChild(newItem);
    itemInput.value = "";
  }
});
Currently, the items disappear on page refresh, but we’ll fix this later by storing data in the backend.
Next, we’ll implement the "Delete" button functionality:
...
// Groceries List Management
const itemInput = document.getElementById("item-input");
const addItemBtn = document.getElementById("add-item-btn");
const groceriesList = document.getElementById("groceries-list");
const pastItemsList = document.getElementById("past-items-list");

addItemBtn.addEventListener("click", async (e) => {
  e.preventDefault();
  const item = itemInput.value;
  if (item.length > 2) {
    const newItem = document.createElement("li");
    newItem.className =
      "list-group-item d-flex justify-content-between align-items-center";
    newItem.textContent = item;

    const removeBtn = document.createElement("button");
    removeBtn.className = "btn btn-outline-danger btn-sm remove-item-btn";
    const removeIcon = document.createElement("i");
    removeIcon.className = "bi bi-trash remove-item-icon";
    removeBtn.appendChild(removeIcon);
    newItem.appendChild(removeBtn);
    groceriesList.appendChild(newItem);
    itemInput.value = "";
  }
});

groceriesList.addEventListener("click", (e) => {
  if (e.target.classList.contains("remove-item-btn")) {
    const pastItem = document.createElement("li");
    pastItem.className = "list-group-item";
    pastItem.textContent = e.target.parentElement.textContent;
    pastItemsList.appendChild(pastItem);
    e.target.parentElement.remove();
  }
  if (e.target.classList.contains("remove-item-icon")) {
    const pastItem = document.createElement("li");
    pastItem.className = "list-group-item";
    pastItem.textContent = e.target.parentElement.parentElement.textContent;
    pastItemsList.appendChild(pastItem);
    e.target.parentElement.parentElement.remove();
  }
});
Now the grocery list interacts with both "Need to buy" and "Past" lists:
We’ll also add functionality for restoring items and clearing the lists:
Finally, let’s set up the database. We’ll define the table with the following structure:
ID: Primary key for easy handling.Name: Name of the grocery item.Need to buy?: Boolean field to track if the item is still needed.Created at: Timestamp for when the item was added.Deleted at: Timestamp for soft deletes.Owner ID: ID of the user who created the item.

To update our code for database interactions, we’ll use the Supabase REST API. Here’s how we insert data:
addItemBtn.addEventListener('click', async e => {
  e.preventDefault();
  const item = itemInput.value;
  if (item.length > 2) {
+    const {data, error} = await sup.from('groceries').insert([{name: item}]).select();
+    if (error) {
+      console.error('Error adding item:', error.message);
+      return;
+    }
+    console.info('Item added successfully:', data);
    const newItem = document.createElement('li');
+    newItem.id = data[0].id;
    newItem.className = 'list-group-item d-flex justify-content-between align-items-center';
    newItem.textContent = item;
    const removeBtn = createRemoveBtn();
    newItem.appendChild(removeBtn);
    groceriesList.appendChild(newItem);
    itemInput.value = '';
  }
});
For removing items, we’ll update the need_to_buy flag in the backend:
-groceriesList.addEventListener('click', e => {
+groceriesList.addEventListener('click', async e => {
  if (e.target.classList.contains('remove-item-btn')) {
+    const {data, error} = await sup.from('groceries').update({need_to_buy: false}).eq('id', e.target.parentElement.id).select();
+    if (error) {
+      console.error('Error updating item:', error.message);
+      return;
+    }
-    const pastItem = createPastItem(e.target.parentElement.textContent);
+    const pastItem = createPastItem(data[0].name, data[0].id);
    pastItemsList.appendChild(pastItem);
    e.target.parentElement.remove();
  }
  if (e.target.classList.contains('remove-item-icon')) {
+    const {data, error} = await sup.from('groceries').update({need_to_buy: false}).eq('id', e.target.parentElement.parentElement.id).select();
+    if (error) {
+      console.error('Error updating item:', error.message);
+      return;
+    }
-    const pastItem = createPastItem(e.target.parentElement.parentElement.textContent);
+    const pastItem = createPastItem(data[0].name, data[0].id);
    pastItemsList.appendChild(pastItem);
    e.target.parentElement.parentElement.remove();
  }
});

...
-function createPastItem(text) {
+function createPastItem(text, id) {
  const pastItem = document.createElement('li');
  pastItem.className = 'list-group-item d-flex justify-content-between align-items-center';
  pastItem.textContent = text;
+  pastItem.id = id;
  const pastItemBtns = document.createElement('div');
  const recoverBtn = createRecoverBtn();
  const removePastBtn = createRemovePastBtn();
  pastItemBtns.appendChild(removePastBtn);
  pastItemBtns.appendChild(recoverBtn);
  pastItem.appendChild(pastItemBtns);
  return pastItem;
}
The restore function works similarly, while soft deletes update the deleted_at field.
For clearing lists, we implement logic to update all relevant fields:
- Clear "need to buy" list: update the "need_to_buy" flag to false
- Clear "past items" list: update the "deleted_at" field to "now"
- Delete all: change "need_to_buy" to
falseand "deleted_at" field to "now"
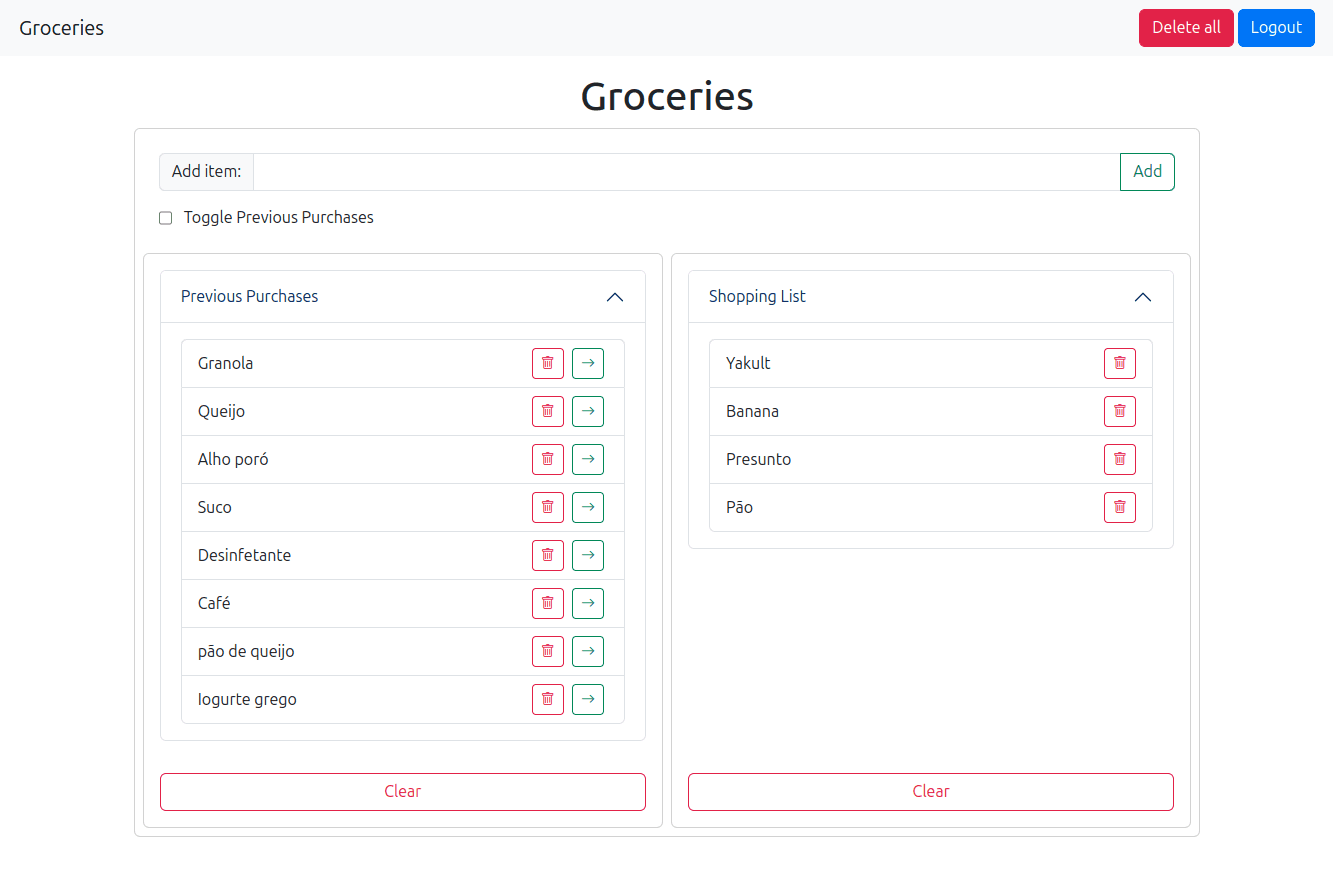
Finally, to improve the user experience, we’ll add:
- Error and success toasts.
- Data fetching from the backend on page load.
- Confirmation modals for list-clearing actions.
- Favicons for the application.
Here’s the result after all improvements:
Conclusion
Building this simple app was an enjoyable experience, reinforcing my skills in HTML, JavaScript, and Bootstrap. It was my first time using Supabase, and I found the process to be smooth and efficient. The combination of Supabase's backend-as-a-service model and GitHub Pages for hosting the frontend made deploying the application easy without needing to set up my own backend infrastructure.
For anyone getting started with web development, this setup provides an excellent opportunity to create a fully functional app using minimal tools while learning how to integrate third-party services into your workflow. I hope this guide helps others like Millena in their own app-building journey.